Go to Top

FAQ

1. How do I create an application, where do I start?

First of all registration is a 2 step process.

1) Member Login:  

Go to My Profile under the AppBuilder Login’ tab, click on it and a new page will open asking you to either Log In or create a new account

A password will be emailed to you, this password is only for accessing the member area,

2) AppBuilder Account Login:

Go back to the AppBuilder tab and click on My Profile, log in using your new account details to access the member area.

Click on AppBuilder Login tab in dropdown menu, under the empty text fields you will see CREATE NEW ACCOUNT link.  Create a 2nd user account here – you can use the same username and password as for Members area.

Now you are in, go to App Templates tab, Choose a template, then Click USE, fill in the App info until completed (might as well do that now) or if you want to practice just click ADD INFO LATER

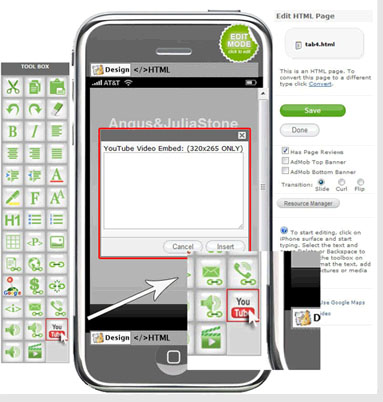
Now you are inside the AppBuilder Dashboard, you will see your new App template there, double click on it to open the simulator GUI

On the right side you have some icons starting with EDIT PAGE, etc  this is where the fun begins… click on everything to get a feel for the interface and workflow, you cant stuff anything up, can always delete the test app and start fresh until you know what you are doing.

Tutorials should be available soon if not already.

2. I finished my application, what is next?

Now you have to make sure that your application is ready for release. Go to App Store Properties. Make sure that your Application icon(57×57) is identical with the iTunes icon (1024×1024) but in different sizes. Fill in required information and click Save. Once you click on the submit button, one of our build engineers will test your application and make sure it works properly. If there are any broken links, buttons that don’t work or content that doesn’t comply with Guidelines we will reject it. Check your app status on website to see when your application gets approved/rejected.

3. Application Status

In-Design (Unpaid) – 0 In-Design (Paid) – 1 Ready-For-Release – 2 In-Review – 3 In-App Store – 4

5. How long will it take for my app to be approved?

It takes on average 3-10 business days, however the process may take longer. 3-10 days is just an estimate based on our past experience with Apple’s review process. Please note that Apple does not provide any timeframe estimate on how long the process may take. Max we’ve seen was 1 month. We’ll be responsible for fixing any technical issues. On your side we expect cooperation in adding proper quality content and follow our guidelines and Apple’s requirements.

7. I have an iPhone app, how can I publish it on Google Play Store as Android app?

We specialize in creating rich content native apps for iPhone and Android too. We try to keep these technologies separate, i.e. if you want a single app to be submitted to both markets then you have to duplicate your content in two separate apps (one for App Store and one for Google Play Store) – we do provide the tools to make this efficiently. To find out about how to duplicate an app, please follow this link

9. How do I insert a YouTube video?

  • Open YouTube.
  • Copy Embed code (it is under the video)
  • Go to AppCloud Co >Find yourpage.html >click on Edit
  • Click on YouTube button (left side toolbox area)
  • Paste the code into YouTube box.
  • Save

howtodownloadyoutube

Make sure that your video’s Embed code is set to 320×265 video resolutions or less, so you can see your video in portrait mode.


12. Can I use PDF files?

You are able to show PDF pages inside your App, to insert them into your app you will need to upload your PDF file and link to it from your app page.


16. Does my iPhone app work on iPad?

Yes, all iPhone apps will work on iPad in magnified mode. We have templates designed specifically for iPad large screen. You need to publish a separate app for iPad only if you want to make use of the large iPad screen – 768 x 1024 px


17. Can I create my app in my own editor and then add it to AppCloud Co?

Click on Backup button in your application Dashboard. Unzip downloaded file. Use Dreamweaver or any other editor to edit your HTML. Keep all your files in the root folder. Do not create subfolders.

When done, zip your folder, go to your app dashboard and Restore project with your own Zip.


20. AdMob, how can I use it?

On App Settings menu of your App Dashboard you’ll find an Ad Mob settings page. Paste your AdMob Publisher ID there. This is a string you get on AdMob website.


22. How can I delete an App (project) from My Application List?

If you want to delete an Unpaid app (app that is not added in our subscription plan) find the X Delete button bellow your application icon in Application Dashboard.

If you want to delete a Paid app (an app that is added in your subscription plan) please open a Support Ticket and we will unlock this app for you (make it unpaid).

23. Where I can find the app binary download link for my Instant Build request?

You should receive an email with link for downloading.

  • Please check your spam folder. Sometimes an email can arrive and promptly be placed in your spam or junk folder.
  • If you are missing an email from us, please check there first and be sure to add the email to your “whitelist” of approved emails.
  •  
  • However, if you didn’t received an email with link for downloading your app binary you can find this download link in your App Dashboard, bellow “Ready To Publish” button.


24. How to use the Dictionary App Page?

The dictionary page type can be used to create native-looking dynamic lists/tables. Tapping on an item can open another list or perform an action (playback video, dial a phone number, display location on map). Lists support sections (groups of items), index and search.


Editing is performed in Edit Dictionary Page. Content can be previewed on device only.
By default the page includes several lists. Each list can include one or more sections. Each section can include one or more items. Items can be dragged to place in the required order within section.
1
Items from one list can interact with other lists or trigger actions.
For instance the “root” list contains the items called “Contacts”, “Dictionary”, etc.
Tapping on these items will display content of the lists called “Contracts”, “Dictionary”, etc, respectively.
2
NB : The list with id ‘root’ must be preserved (this is the list that is displayed on page launch).
List parameters include:
Id – identify the list.
Style – (plain /grouped) display list items as plain list or group them.
Section index – if enabled, adds the index bar on the right side of the page.
Section index allows fast scrolling to particular section.
Text search – if enabled, adds a search bar to the top of page.
Text search allow to search by first letter/ word contained in the list item.
3
 
Sections can have individual titles.
4
List items are contained within the section.
5
Item parameters include:
Text:  item title (main text)
Detail text:  detailed text of the item
Detail text lines:  number of lines to display the detail text of item (0 = unlimited lines, 3 = 3 lines of text maximum)
Action:  set an action to be performed when item list is tapped
 
   List – open another list (in the field “Action param” specify the name of that list)
   Tel – dial a phone number (in the field “Action param” specify the phone number)
   Mailto – launch Mail app (in the field “Action param” specify the email of the adressee)
   Open – open a webpage (in the field “Action param” specify the URL)
   Map – launch Map app and displays a location (in the field “Action param” specify address)
   Video – plays a video file (in the field “Action param” specify the link to the video file)
Action param:  is a parameter specified depending on the type of action set for the list item.
Style:  (default, subtitle, style1, style2) allows to chose the text layout.
6
Specimen of styles can be viewed in the lists Plain styles and Grouped styles.

25. How do I add a header image to an App page

In this example we are assuming you are building an iPhone or Android Mobile App.

1) Prepare your Header Image first, ensuring it is no more than 320px wide – image file extension must be a gif, png or jpg (not jpeg)

2) Go to your App Dashboard

3) Click ‘EDIT PAGES’

4) Click RESOURCES

5) In the right column,  select on the HTML page you wish to add the banner image to

6) On the far right side click on the Mobile icon that says EDIT

7) Once the page opens,  top left of the simulator image you will see DESIGN & HTML – click on HTML

8) Now you will see the HTML code for the page, the top line is where the header image name needs to go. You need to know what the name of your header image is eg: (HeaderImage.png)  And place your header name in the src =”

9) By default the line will be commented out so it is inactive. All you need to do is remove the two tags at the start and at the end of the line  like shown in the video.